This document contains the steps required for installing and configuring a KVM virtual host server for use as virtualized development lab environment. The main requirement was exposing virtual machines to the ambient local area network (bridged networking).
- Hardware: Lenovo ThinkServer TS140
- Host OS: Ubuntu Server 16.04 LTS
Hardware & BIOS Setup
- BIOS upgrade using a bootable DOS usb stick. Without the BIOS upgrade, system boot invariably failed if an external USB FDD was attached.
- Boot to BIOS. There’s also an option to use an EasySetup disk, but apparently it’s only useful when installing a windows OS or VMware ESXi.
- Enable virtualization extensions in CPU setup (VT)
- Enable VT-d as well if direct exclusive device assignment to guests is needed (see here).
Operating System
Install Ubuntu Server 16.04 LTS, select the following features:
- Basic Ubuntu Server
- OpenSSH server
- Virtualization Host (installs the kvm host packages automatically. Leave unselected for manual installation)
Checking Hardware Virtualization Support
After installing the operating system, you can perform various tests to verify virtualization support.
egrep '(vmx|svm)' --color /proc/cpuinfo should display vmx or svm in red.
egrep -c '(vmx|svm)' /proc/cpuinfo should give non-zero result.
kvm-ok should give message saying:
INFO: /dev/kvm exists
KVM acceleration can be used
virt-host-validate should give a message like this:
QEMU: Checking for hardware virtualization : PASS
QEMU: Checking for device /dev/kvm : PASS
QEMU: Checking for device /dev/vhost-net : PASS
QEMU: Checking for device /dev/net/tun : PASS
LXC: Checking for Linux >= 2.6.26 : PASS …
lsmod | grep kvm should list either kvm_intel or kvm_amd
IOMMU (I/O Memory Management Unit) support
If the above command produces a warning IOMMU appears to be disabled in kernel. Add intel_iommu=on to kernel cmdline arguments then you can enable IOMMU like so:
Edit the file /etc/default/grub and add intel_iommu=on to the end of the existing GRUB_CMDLINE_LINUX option, separated by whitespace e.g. GRUB_CMDLINE_LINUX="intel_iommu=on
Update grub and reboot
sudo update-grub sudo reboot
(Adapted from instructions for fedora)
Installing KVM and Command Line Management Tools
Install the following packages using apt-get, unless you selected “Virtualization Host” as one of the features during operating system installation:
ubuntu-virt-servermetapackage that contains:qemu-kvmlibvirt-binopenssh-server
bridge-utilsto manage bridged networking (brctl etc.)
The current user is added to libvirtd group automatically. Use sudo usermod -a -G libvirtd <user> to add other users if necessary (log out and back in).
Check also that you belong to the kvm group and if not, run sudo usermod -a -G kvm <user>.
The following packages are recommended:
ubuntu-vm-builder(one option for building virtual machines)pythonpython-vm-builder
ubuntu-virt-mgmtmetapackage that contains:virt-viewer(for viewing vms)virt-manager(GUI for VM management)
virtinst(Programs to create and clone virtual machines)libguestfs-tools(tools for accessing and modifying virtual machine disk images)
TODO required??
qemu-system(QEMU full system emulation binaries)
Libguestfs
For libguestfs tools like virt-cat, virt-edit and virt-sysprep to work (on Ubuntu), run the following commands after installing the package.
For more detailed instructions see here.
sudo update-guestfs-appliance
sudo chmod 0644 /boot/vmlinuz*
Bridged Networking
Setup Bridge on the Host
Setting up the bridge requires the bridge-utils package installed in the previous section. The bridge connects the virtual machines’ virtual network interfaces (taps) directly to the local area network through the host server’s primary network interface as if the virtual machines were physically present in the local area network along with the host.

Check the device name of the primary network interface using nmcli dev status.
The device name may be something like “em1” or “eno1” (biosdevname naming for integrated network interfaces) instead of the familiar “eth0”
If network manager is in use, you may want to disable it before continuing (not necessary though).
On a local session, run
stop network-manager(don’t do this unless on a local session, kills the network connectivity entirely) andecho "manual" | sudo tee /etc/init/network-manager.override
Edit /etc/network/interfaces to disable primary interface (eth0/em1) unless controlled by network manager (no problem if it is), add bridge (with primary interface as bridged port).
auto br0
iface br0 inet dhcp
    bridge_ports em1
    bridge_stp off
    bridge_fd 0
    bridge_maxwait 0
Restart networking /etc/init.d/networking restart.
ifconfig should show br0 with a valid ip address.
brctl show should show br0 connected to interface em1 and another bridge virbr0 (kvm private networking bridge).
nmcli dev status should show em1 as unmanaged (even without disabling network manager).
After starting a guest vm, a virtual interface should show on the bridge as well (e.g. vnetX or tapX).
Additional Bridge Setup Steps
These steps may improve the performance of the bridge (see Libvirt Networking).
TODO Verify
Add the following to /etc/sysctl.conf:
net.bridge.bridge-nf-call-ip6tables = 0
net.bridge.bridge-nf-call-iptables = 0
net.bridge.bridge-nf-call-arptables = 0
and run sysctl -p /etc/sysctl.conf.
Add the following to /etc/rc.local before the line with exit 0:
/sbin/sysctl -p /etc/sysctl.conf
iptables -A FORWARD -p tcp --tcp-flags SYN,RST SYN -j TCPMSS  --clamp-mss-to-pmtu
Create a Virtual Network Using the Existing Bridge
This is an optional step and is not required for bridged networking. However a virtual network must exist for operations that rely on a named network, such as creating virtual machines with docker-machine.
Create the following network specification:
<network>
  <name>[network name]</name>
  <forward mode="bridge"/>
  <bridge name="br0"/>
</network>
Running virsh net-create <file name> creates a transient virtual network based on the file, which is sufficient at least for the docker-machine case mentioned above
(the resulting VM configuration refers to the underlying bridge instead of the virtual network).
If you want to create a persistent virtual network, then run virsh net-define <file name> followed by virsh net-autostart <network name> and virsh net-start <network name>.
Guest Configuration
Each guest needs a separate mac address. The kvm and virt-install commands as well as VMM autogenerate a valid mac address if not explicitly specified.
The below script can be used to generate valid mac addresses (KVM Networking) if you want to specify them manually.
MACADDR="52:54:00:$(dd if=/dev/urandom bs=512 count=1 2>/dev/null | md5sum | sed 's/^\(..\)\(..\)\(..\).*$/\1:\2:\3/')"; echo $MACADDRThe manually created mac address can be specified in the virsh domain xml:
<interface type='bridge'>
  <mac address='00:11:22:33:44:55'/>
  <source bridge='br0'/>
  <target dev='vnetX'/>
  <model type='virtio'/>
  <alias name='net0'/>
  <address ... />
</interface>
When installing the VM with virt-install, the following parameters can be used: --network bridge=br0,model=virtio,[mac=<predefined mac address>]
(or --network network=<network name>,model=virtio if you have created a libvirt virtual network using the bridge).
TODO network gets configured the same way even without the –network parameter if the network is persistent (eth0).
TODO Docker-machine created network docker-machines is assigned to interface called docker0 automatically on unrelated VMs. Why?
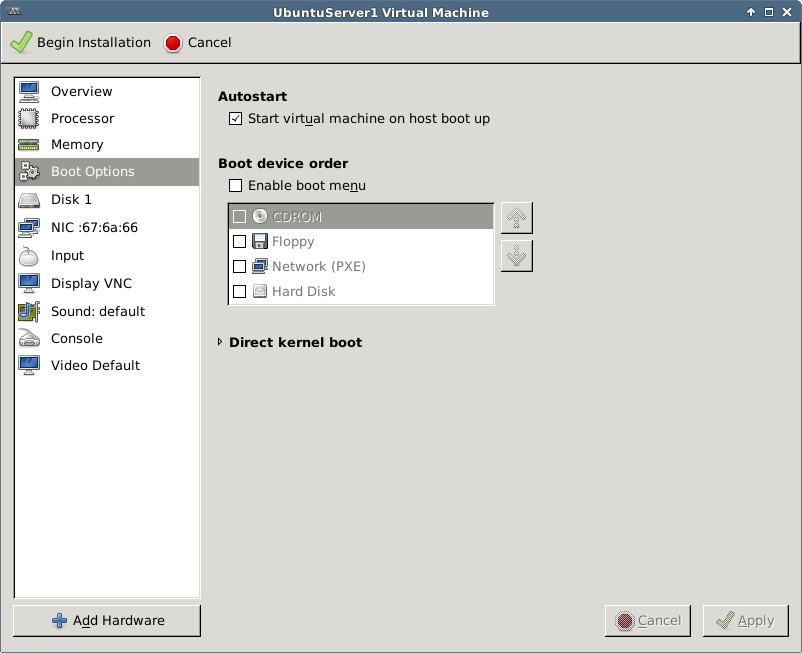
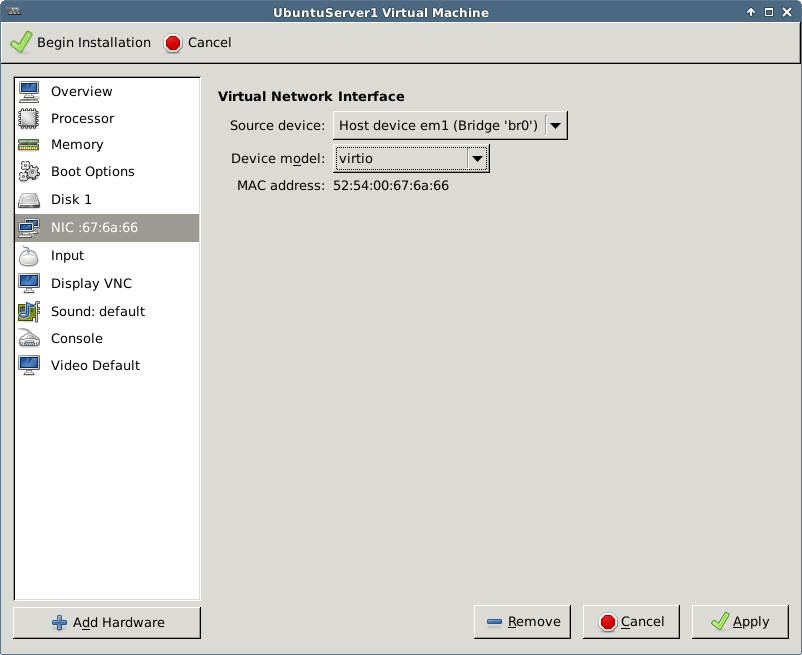
In VMM the bridge is configured during installation or later in the NIC section:
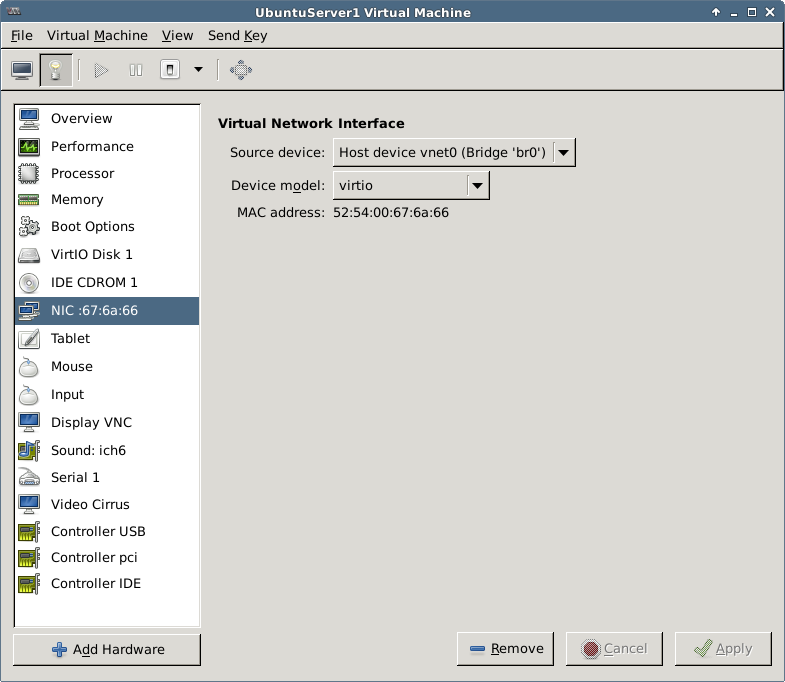
For more network related instructions, see Libvirt Networking, KVM Networking and KVM Networking (Ubuntu).
Creating Guests
Debian based systems have the script
/usr/bin/kvmby default, that executesqemu-system-x86_64 -enable-kvm <parameters>. Use the latter if the kvm command is not available.
About Guest Images
- Processor features: use
-cpu hostwith qemu to pass all host processor features to guest (don’t use if need to have portable image). - Use virtio for networking if available (rtl8139 and e1000 have better guest support but virtio has better performance). For example, rtl18139 works with XP out of the box while e1000 and virtio do not.
- Use virtio for storage if available (best performance, but IDE has better support for guests). For example Windows OSes work with IDE or SATA out of the box but not with virtio.
- Easiest storage formats for images are qcow2 and raw. The latter gives better performance but reserves all allocated space when created. Disable cache when using raw.
- libvirtd logs from kvm commands are written into
/var/log/libvirtd/qemu/<guest name>.log
More about tuning guest performance here.
Storage Pools
Virsh can manage disk images in different kinds of storage pools.
The default pool is a directory pool, which refers to a directory on the local disk.
Manually created images can be added under libvirt management regardless of the location on disk.
However, VMM and virt-install can create new image files only inside storage pools.
Therefore, if you want to store the images outside of the default pool,
you must either create a new pool or always create the image file first separately using qemu-img.
Use virsh pool-list to view existing pools (a single, default pool exists after installation).
Examine the xml returned by e.g. virsh pool-dumpxml default to view e.g. the directory location of a pool.
<pool type='dir'>
  <name>default</name>
  <uuid>71b996d7-ffe6-5cb1-f6f4-94155ce25ba2</uuid>
  <capacity unit='bytes'>488111095808</capacity>
  <allocation unit='bytes'>24755052544</allocation>
  <available unit='bytes'>463356043264</available>
  <source>
  </source>
  <target>
    <path>/var/lib/libvirt/images</path>
    <permissions>
      <mode>0711</mode>
      <owner>-1</owner>
      <group>-1</group>
    </permissions>
  </target>
</pool>
To create a new directory pool, run the following commands:
virsh pool-define-as --name <pool name> --type dir --target <directory path>
virsh pool-autostart <pool name>
virsh pool-start <pool name>
After this, new images can be created with virt-install or VMM in the new directory path.
A more advanced discussion on storage pools is outside the scope of this document.
Creating a Disk Image and Installing a Guest OS
Installation of guest OSes from cds, dvds or iso images usually requires that the user is able to interact with the operating system console (display, keyboard, mouse). The most straightforward way to accomplish this is to have an X session on the host (either physically or remotely, e.g. RDP or VNC). Guest installation on a headless server requires connecting to the guest machine over the network using VNC after starting the installation on the command line.
A lot of pre-installed images are available from various sources, for example:
The information in section Cloning Guests applies also for using pre-installed images.
TODO How to set up grub so that boot sequence never gets stuck in the boot menu.
Manually
Create a disk image with qemu-img create -f qcow2 vdisk.img <disk size gigabytes>G.
Install the operating system from an installation media:
sudo kvm -hda vdisk.img -cdrom /path/to/boot-media.iso -boot d -m <memory in megabytes> -net nic,model=virtio -net tap`The -boot d option instructs the OS to boot from the first CD-ROM drive.
The -net nic,model=virtio -net tap part enables bridged networking.
Replace virtio with some other network hardware model (e.g. rtl8139) if the guest OS does not support virtio.
The kvm command with bridged networking must be run with root privileges unless the current user is granted permission to manipulate /dev/net/tun (this is not a problem when using VMM or virt-install).
You can manually specify a mac address for the network interface, e.g.: -net nic,model=virtio,macaddr=00:00:10:52:37:48.
In a headless environment, you need to connect to the guest with a VNC client after starting the installation:
- Add the following parameters to the kvm command:
-vnc :X -no-rebootwhere X is the vnc display number (e.g. 2) which corresponds to a tcp port number in the range 59XX (e.g. 5902). The-no-rebootswitch prevents the OS from rebooting automatically after installation. - Connect to TCP port 59XX of the host machine (e.g. 5902) with a vnc viewer to complete the installation.
To password-protect the vnc session, add ,password to the -vnc option.
An additional option -monitor stdio is required to get access to the qemu monitor (prompt (qemu)) where the vnc password is set.
$ sudo kvm -hda vdisk.img ... -vnc :X,password -monitor stdio`
QEMU 2.0.0 monitor - type 'help' for more information
(qemu) change vnc password
Password: *****
Type quit in the (qemu) prompt to terminate the virtual machine and exit the monitor.
You can use the -nographic option to open the guest console directly in the terminal if the guest OS supports it (exit terminal mode with Ctrl-A X).
More options:
-no-acpiuse this if guest is having problems with ACPI.-localtimeset rtc to local time instead of utc. Required at least for DOS or Windows.-usb -usbdevice tabletfor a better mouse experience in graphical mode (mouse control is better but may still be laggy).
After installation, the image can be started up with the same command line by removing the boot command or by changing it to boot from the first hard disk instead of the installation media (e.g. -boot c).
The installation media option --cdrom ... can also be removed.
sudo kvm vdisk.img -m <memory in megabytes> -boot c [-snapshot]
  -net nic,model=virtio -net tap
The -boot c option is the default and instructs the OS to boot from the first hard disk.
You can use the -snapshot option to prevent any changes to be written on the disk image itself (writes to temp files instead).
In a headless environment, you can use the -nographic option to run in terminal mode if the guest OS supports it (exit terminal mode with Ctrl-A X).
If you need to Find the IP of a running VM and the mac address is known, run arp -an | grep <mac address of the VM>
An example for installing and running a Windows XP guest:
sudo kvm -hda xp.img -cdrom /path/to/image.iso -boot d -m 1024
  -net nic,model=rtl8139 -net tap
  -localtime -no-acpi -usb -usbdevice tablet
sudo kvm -hda xp.img -boot c -m 1024
  -net nic,model=rtl8139 -net tap
  -localtime -no-acpi -usb -usbdevice tablet
The resulting image can be imported to be managed under libvirt using either virt-install or VMM.
A third method is to create a domain xml file manually and use the virsh commands (see section Managing Guests) to define the virtual machine.
With virt-install
The virt-install command can be used to create new or to import existing virtual machines.
The following command creates a new image and installs a system on it.
Note the size in the --disk argument and the installation media specified using the --cdrom argument.
The disk location must point to a directory that belongs to a storage pool.
virt-install --name <guest name> --ram <memory in megabytes> --vcpus <no of cpus>
  --network bridge=br0,model=virtio[,mac=<predefined mac address>]
  --os-type=linux --os-variant=ubuntutrusty
  --disk path=<path-to-disk-image>.img,bus=virtio,format=qcow2,size=<disk size in GB>
  --cdrom=<path-to-installation-media>.iso
In a headless environment, you need to connect to the guest with a VNC client after starting the installation:
- Add the following parameters to the
virt-installcommand:--graphics vnc,listen=0.0.0.0,port=59XX,password=<pwd>where 59XX is the tcp port number for a vnc display (e.g. 5902 for display no. 2) - Connect to TCP port 59XX of the host machine (e.g. 5902) with a vnc viewer and supply the specified password to complete the installation.
The following command imports an existing disk image.
The --import switch skips installation phase and the --noautoconsole switch prevents the command from automatically connecting to terminal or vnc display.
Note also that there is no disk size specified for the --disk parameter.
virt-install --name <guest name> --ram <memory in megabytes> --vcpus <no of cpus>
  --network bridge=br0,model=virtio[,mac=<predefined mac address>]
  --os-type=linux --os-variant=ubuntutrusty
  --disk path=<path-to-disk-image>.img,bus=virtio,format=qcow2
  --import
  --noautoconsole
The --os-type and --os-variant parameters can be used to set some useful default settings for the VM.
The supported OS Type values in VMM are Generic, Linux, Other, Solaris, UNIX and Windows. I haven’t seen these documented elsewhere.
The available OS Variants can be listed by running the command virt-install --os-variant list. The --os-type parameter is not required if --os-variant is used.
For example, to install Windows Server 2012 R2:
virt-install --name WindowsServer1 --ram 2048 --vcpus 2
   --network bridge=br0,model=e1000
   --os-variant=win2k8
   --disk path=<path-to-disk>.img,bus=sata,format=qcow2,size=10
   --cdrom=<path-to-windows_server_2012_r2_x64_dvd>.iso
For linux guests, the ttyconsole should be automatically created, check with virsh ttyconsole <guest name>.
The newly created VM should show up in both virsh list --all and VMM.
You can use the --nographics option to open the guest console directly in the terminal if the guest OS supports it (exit terminal mode with Ctrl-A X).
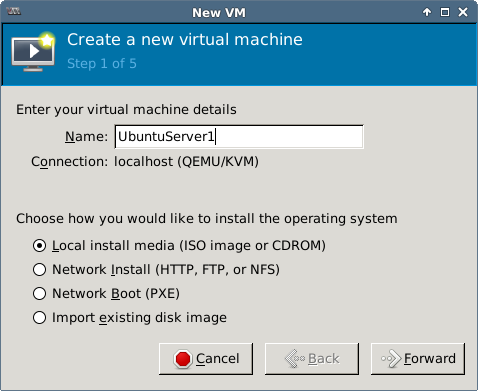
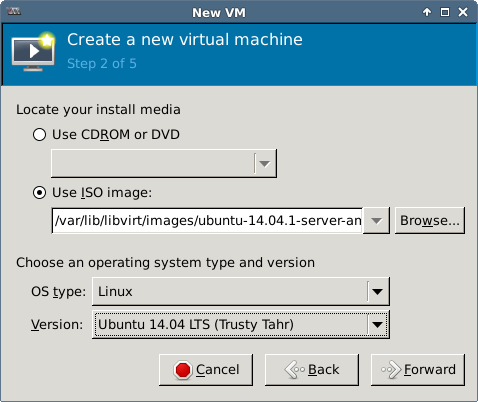
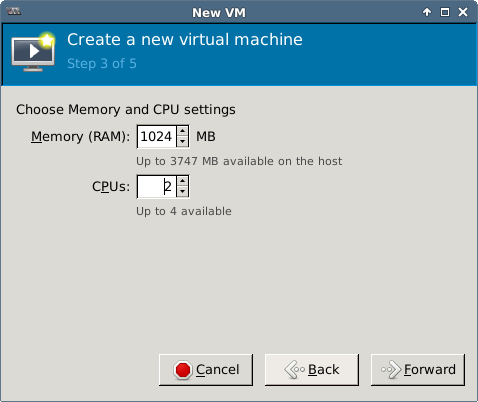
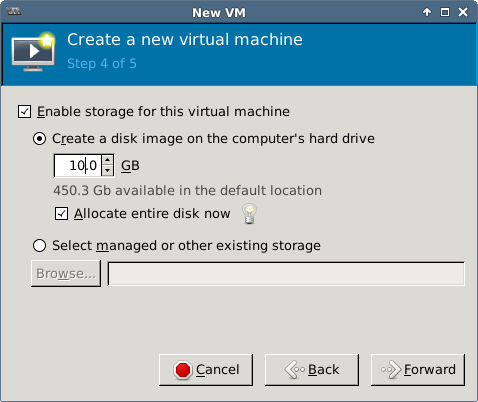
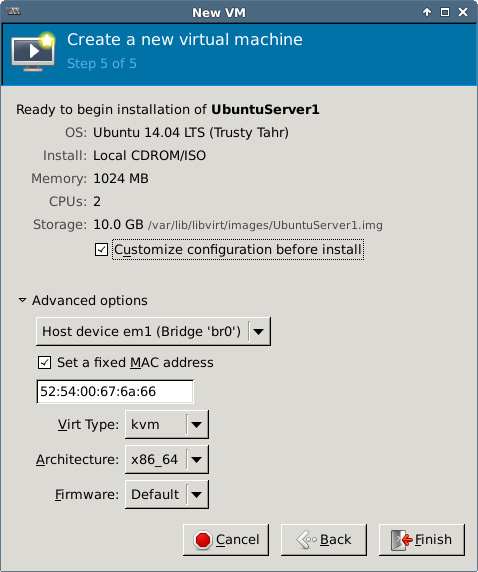
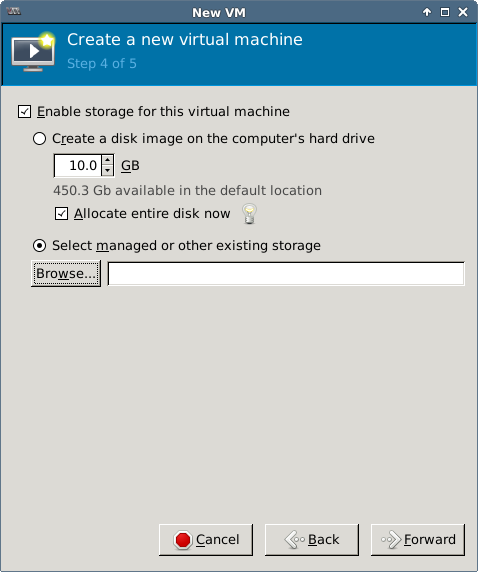
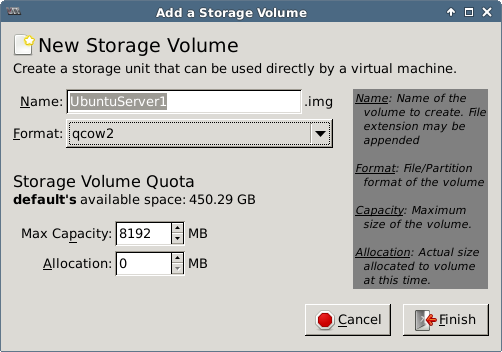
With VMM (virt-manager)
Launch virt-manager or Virtual Machine Manager from system menu.
The tool creates new images in the default storage pool /var/lib/libvirt/images/ by default.

Execute virsh list to see the image now running under virsh.
Curious people can look in /var/log/libvirt/qemu/<guest name>.log to see the kvm command used for the installation.
/usr/bin/kvm-spice -name UbuntuServer1
	-S
	-machine pc-i440fx-trusty,accel=kvm,usb=off
	-m 1024
	-realtime mlock=off
	-smp 2,sockets=2,cores=1,threads=1
	-uuid 87da8396-5ef0-f851-aa86-e680ba49c882
	-no-user-config
	-nodefaults
	-chardev socket,id=charmonitor,path=/var/lib/libvirt/qemu/UbuntuServer1.monitor,server,nowait
	-mon chardev=charmonitor,id=monitor,mode=control
	-rtc base=utc
	-no-shutdown
	-boot strict=on
	-device piix3-usb-uhci,id=usb,bus=pci.0,addr=0x1.0x2
	-drive file=/var/lib/libvirt/images/UbuntuServer1.img,if=none,id=drive-virtio-disk0,format=qcow2
	-device virtio-blk-pci,scsi=off,bus=pci.0,addr=0x5,drive=drive-virtio-disk0,id=virtio-disk0,bootindex=1
	-drive if=none,id=drive-ide0-1-0,readonly=on,format=raw
	-device ide-cd,bus=ide.1,unit=0,drive=drive-ide0-1-0,id=ide0-1-0
	-netdev tap,fd=24,id=hostnet0,vhost=on,vhostfd=25
	-device virtio-net-pci,netdev=hostnet0,id=net0,mac=52:54:00:67:6a:66,bus=pci.0,addr=0x3
	-chardev pty,id=charserial0
	-device isa-serial,chardev=charserial0,id=serial0
	-vnc 127.0.0.1:0
	-device cirrus-vga,id=video0,bus=pci.0,addr=0x2
	-device intel-hda,id=sound0,bus=pci.0,addr=0x4
	-device hda-duplex,id=sound0-codec0,bus=sound0.0,cad=0
	-device virtio-balloon-pci,id=balloon0,bus=pci.0,addr=0x6
To import an existing image, select the “Import existing disk image” option when creating a new VM.
With vm-builder
TODO https://www.howtoforge.com/virtualization-with-kvm-on-ubuntu-12.10 for vmbuilder, LVM-based virtual machines
Console Access to Linux Guest From Host
virsh ttyconsole <name> should give e.g. /dev/pts/<number>
virt-install and VMM should create the following in the domain definition by default
<console type='pty'>
	<target port='0'/>
</console>
Use echo $TERM output on host to determine which terminal to use in the command (xterm is used here)
See KVM Access for more details.
On Guest
Create file /etc/init/ttyS0.conf with contents:
start on stopped rc RUNLEVEL=[2345]
stop on runlevel [!2345]
respawn
exec /sbin/getty -L 115200 ttyS0 xterm
Execute start ttyS0
On Host
Execute virsh connect <domain>. Press enter to get login prompt.
Use Ctrl + ] or Ctrl + 5 or Ctrl + [^¨~] to exit the console (depends on key map which escape
key works, see How to exit virsh.
Mouse Integration
If you’re experiencing problems while using the mouse on the guest system, try switching to a virtual tablet input device (absolute coordinates instead of relative).
Using the --os-type or --os-variant parameter with virt-install should optimize the mouse along with other aspects of the guest.
There does not seem to be an explicit way of adding a tablet device with virt-install.
When running manually with kvm add parameters -usb -usbdevice tablet.
In VMM add new input device:
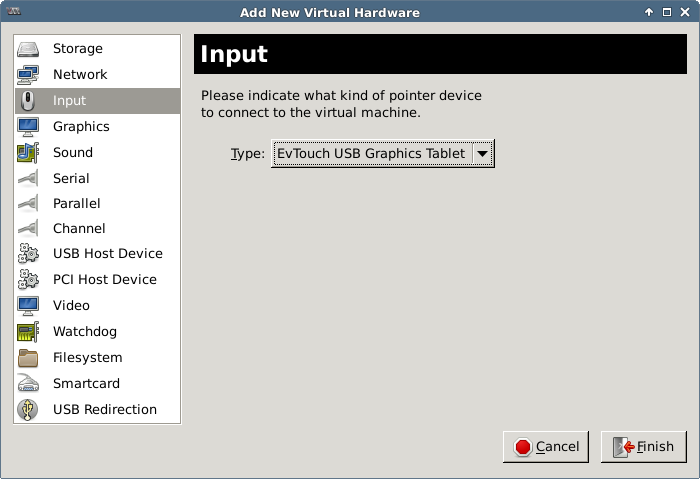
In the guest definition XML the same is achieved with:
<input type='tablet' bus='usb'>
  <alias name='input0'/>
</input>
Share a Directory on Host to a Guest VM
Linux Guest
Add the following under the devices section in domain xml. The label is used with the mount command later on the guest.
<devices>
  ...
  <filesystem type='mount' accessmode='mapped'>
    <source dir='<path on host>'/>
    <target dir='<label>'/>
  </filesystem>
  ...
</devices>
On guest, edit /etc/modules and add the following lines if missing:
9p
9pnet
9pnet_virtio
Run sudo service kmod start to load the modules or restart the VM.
Run sudo mount <label> <path on guest> -t 9p -o trans=virtio or add the following line to /etc/fstab to mount automatically on boot.
<label> <path on guest> 9p trans=virtio 0 0You may need to experiment with different access modes and host directory permissions to get the read/write permissions right in your scenario. See these blog posts for more information:
Windows Guest
TODO
Cloning VMs
A cloned virtual machine requires a new Name MAC address, UUID and a new host name (for DNS to work).
You can clone a virtual machine directly using either VMM UI or virt-clone.
Another option is to copy the disk image directly and import it with virt-install --import.
In all cases the original virtual machine should be shut down before cloning / copying the image.
The last option is useful if you intend to keep template images ready for cloning new servers.
The virt-sysprep utility in the libguestfs-tools package that can be used to reset/unconfigure/customize/generalize a server image (e.g. add or remove static configuration like MAC address, host name, SSL certs) for this purpose.
The tool does not support windows images currently but probably will in a future version (in the mean time, there’s a windows tool sysprep.exe that must be run on the guest).
For more information, see here: virt-sysprep.
All of the options above generate a new Name, MAC and UUID automatically. However, the hostname (and possibly other configuration) must still be set on the new guest itself.
There’s a guide for converting VirtualBox images to KVM images here: Convert VirtualBox Image to KVM Image
Cloning the Virtual Machine
Shut down the source guest VM before cloning, e.g. virsh shutdown <source guest name>.
With virt-clone
Execute virt-clone -o <source guest name> -n <new guest name> -f <path-to-new-disk-image>.
Configuring the VM
The naïve way to configure the VM is to start it up, connect to it an make the changes there.
This can be done by starting the VM with virsh or VMM and connecting with virsh console <new guest name>.
Alternatively, you can run the image directly with kvm and make the same changes there.
- edit both /etc/hostname and /etc/hosts on guest, set new host name in both files
- reboot guest or
sudo hostname <new hostname>
A better approach (for linux guests) is to use virt-edit from the libguestfs-tools package.
virt-edit -d <new guest name> /etc/hostnamevirt-edit -d <new guest name> /etc/hosts
Instead of the -d option for guest name you can use the -a option to supply a path to the disk image directly.
Unfortunately the EDITOR environment variable does not affect virt-edit so the command brings up the vi editor by default.
TODO maybe there’s another env variable… quick googling did not yield any results.
Libguestfs provides a lot more useful tools for vm image manipulation. See here: libguestfs.
If you do not have access to libguestfs-tools, there’s another method described here: How to clone virtual machines in KVM - tutorial.
Resizing a VM Image
With the libguestfs tools, resizing cannot be done in place. Instead, a new image is created based on the old one. For more information, see the following documents:
Expand a single partition (linux)
Example of increasing the disk space on a single partition inside a basic linux VM. LVM must not be in use and the image must be in the qcow2 format. Shut down the virtual machine before executing the commands below.
Run virt-filesystems --long -h --all -a <old guest image> to list file systems.
Note the name of the partition to expand, e.g. /dev/sda2.
Run the following commands:
qemu-img create -f qcow2 -o preallocation=metadata <new guest image> <new total size>G
virt-resize --expand <partition name> <old guest image> <new guest image>
Managing Guests
TODO kvm management tools http://www.linux-kvm.org/page/Management_Tools
TODO virt-viewer
TODO VMM
Virsh commands
virsh list --allshows all VMs managed by virshvirsh define <filename>.xmldefine a new guest / update existing (guest name defined in xml file, changes effective after next boot)virsh undefine <guest name>virsh dumpxml <guest name> > <filename>.xmldumps the domain xml to given filevirsh edit <guest name>edit the domain xml for a guest, changes effective after next bootvirsh create <filename>.xmldefine and start a new guestvirsh start <guest name>starts the specified guest VMvirsh destroy <guest name>hard power off a guestvirsh shutdown <guest name>send shutdown signalvirsh suspend <guest name>send suspend signalvirsh resume <guest name>send resume signalvirsh reboot <guest name>send reboot signalvirsh console <guest name> [devname]connect to console on guest (optional device name)virsh autostart <guest name> [--disable]sets guest to autostart on host startvirsh dominfo <guest name>displays basic domain info- TODO virsh save/restore and other stuff https://www.centos.org/docs/5/html/5.2/Virtualization/chap-Virtualization-Managing_guests_with_virsh.html
Use --connect qemu:///system argument with these commands to explicitly target the local daemon’s system VMs (sometimes necessary)
Libguestfs commands
virt-cat -d <guest name> <file path>virt-cat -a <path-to-disk-image> <file path>virt-edit -d <guest name> <file path>virt-edit -a <path-to-disk-image> <file path>
For more commands, see libguestfs.
About Edit Commands
The default editor for edit commands like virsh-edit or virt-edit is vi.
For virsh commands, the editor can be changed using VISUAL or EDITOR environment variables.
For libguestfs commands, the editor can be changed using the EDITOR environment variable.
E.g. export EDITOR="nano -w", revert with unset EDITOR
Other
Libvirt changes the ownership of image files as part of it’s operations, regardless of original ownership.
- When the virtual machine is started, the ownership is changed to
libvirt-qemu:kvm. - When the virtual machine is stopped, the ownership is changed to
root:root.
Therefore you may need to change the image file ownership prior to executing any commands directly against the image file (such as the libguestfs commands) or run the commands as root.
Deleting a virtual machine
If the VM is running, execute virsh destroy <guest name>.
Execute virsh undefine <guest name>.
Updating the Guest Definition XML
Execute virsh dumpxml <guest name> > <filename>.xml to dump the virsh definition xml.
Make changes to the domain xml and execute virsh define <filename>.xml to update the definition (the name of the domain is included in the xml).
Or edit the domain xml directly using virsh edit <guest name>.
In both cases, the changes will take effect on next proper boot (reboot has no effect):
virsh shutdown <guest name>virsh start <guest name>
An example domain xml file:
<domain type='kvm'>
  <name>UbuntuServer1</name>
  <uuid>87da8396-5ef0-f851-aa86-e680ba49c882</uuid>
  <memory unit='KiB'>1048576</memory>
  <currentMemory unit='KiB'>1048576</currentMemory>
  <vcpu placement='static'>2</vcpu>
  <os>
    <type arch='x86_64' machine='pc-i440fx-trusty'>hvm</type>
    <boot dev='hd'/>
  </os>
  <features>
    <acpi/>
    <apic/>
    <pae/>
  </features>
  <clock offset='utc'/>
  <on_poweroff>destroy</on_poweroff>
  <on_reboot>restart</on_reboot>
  <on_crash>restart</on_crash>
  <devices>
    <emulator>/usr/bin/kvm-spice</emulator>
    <disk type='file' device='disk'>
      <driver name='qemu' type='qcow2'/>
      <source file='/var/lib/libvirt/images/UbuntuServer1.img'/>
      <target dev='vda' bus='virtio'/>
      <address type='pci' domain='0x0000' bus='0x00' slot='0x05' function='0x0'/>
    </disk>
    <disk type='block' device='cdrom'>
      <driver name='qemu' type='raw'/>
      <target dev='hdc' bus='ide'/>
      <readonly/>
      <address type='drive' controller='0' bus='1' target='0' unit='0'/>
    </disk>
    <controller type='usb' index='0'>
      <address type='pci' domain='0x0000' bus='0x00' slot='0x01' function='0x2'/>
    </controller>
    <controller type='pci' index='0' model='pci-root'/>
    <controller type='ide' index='0'>
      <address type='pci' domain='0x0000' bus='0x00' slot='0x01' function='0x1'/>
    </controller>
    <interface type='bridge'>
      <mac address='52:54:00:67:6a:66'/>
      <source bridge='br0'/>
      <target dev='tap0'/>
      <model type='virtio'/>
      <alias name='net0'/>
      <address type='pci' domain='0x0000' bus='0x00' slot='0x03' function='0x0'/>
    </interface>
    <serial type='pty'>
      <target port='0'/>
    </serial>
    <console type='pty'>
      <target type='serial' port='0'/>
    </console>
    <input type='mouse' bus='ps2'/>
    <input type='keyboard' bus='ps2'/>
    <graphics type='vnc' port='-1' autoport='yes'/>
    <sound model='ich6'>
      <address type='pci' domain='0x0000' bus='0x00' slot='0x04' function='0x0'/>
    </sound>
    <video>
      <model type='cirrus' vram='9216' heads='1'/>
      <address type='pci' domain='0x0000' bus='0x00' slot='0x02' function='0x0'/>
    </video>
    <memballoon model='virtio'>
      <address type='pci' domain='0x0000' bus='0x00' slot='0x06' function='0x0'/>
    </memballoon>
  </devices>
</domain>
Valid units for memory: b, KB, KiB, MB, MiB, GB, GiB etc.
From the documentation:
Valid units are “b” or “bytes” for bytes, “KB” for kilobytes (103 or 1,000 bytes), “k” or “KiB” for kibibytes (1024 bytes), “MB” for megabytes (106 or 1,000,000 bytes), “M” or “MiB” for mebibytes (220 or 1,048,576 bytes), “GB” for gigabytes (109 or 1,000,000,000 bytes), “G” or “GiB” for gibibytes (230 or 1,073,741,824 bytes), “TB” for terabytes (1012 or 1,000,000,000,000 bytes), or “T” or “TiB” for tebibytes (240 or 1,099,511,627,776 bytes). However, the value will be rounded up to the nearest kibibyte by libvirt, and may be further rounded to the granularity supported by the hypervisor. Some hypervisors also enforce a minimum, such as 4000KiB.
See Libvirt Domain XML Format for more information on the file format.
References & Resources
Documentation
- KVM HOWTO
- KVM Installation
- KVM Command Line
- KVM Intro
- KVM Tuning
- How to Debug Virtualization problems
- KVM Networking (Ubuntu)
- KVM Networking
- KVM Network Bridging
- KVM Access
- KVM Management Tools
- KVM Virsh Help
- KVM VT-d
- Ubuntu libvirt guide
- libguestfs
- Libvirt Domain XML Format
- Libvirt Networking
Man Pages
Other
- How to exit virsh
- Convert VirtualBox Image to KVM Image
- Find the IP of a running VM
- How to get started with libvirt on Linux
- File System Pass-Through in KVM/Qemu/libvirt
- Sharing directories with virtual machines and libvirt
- How to clone virtual machines in KVM - tutorial