Docker Machine can be used to quickly provision virtual machines for use as docker hosts or for controlling existing hosts (using the generic driver). There is a selection of drivers available for both local and remote virtualization hosts/providers. Check the official documentation for a list of available drivers and driver-specific documentation.
The tool also helps in configuring the command line tools to point to a docker host instance (docker-machine env <vm-name>).
Note that docker machine is not suitable for deploying and managing production environments, at least due to the lack of support for moving machine connectivity configurations across workstations. Therefore the only feasible use case is provisioning local or remote machines for development and testing purposes for a single user.
Installation
On linux, the docker-machine binary is a separate install (the docker toolbox and the docker for windows/mac tools both install docker-machine by default). Check the latest version in https://github.com/docker/machine/releases and follow the instructions, e.g.:
curl -L https://github.com/docker/machine/releases/download/v0.7.0/docker-machine-`uname -s`-`uname -m` >/usr/local/bin/docker-machine
chmod +x /usr/local/bin/docker-machine
Creating VMs
Docker Machine supports a variety of drivers (local or remote).
The default operating system on the virtual machines depends on the driver.
On local instances, the OS is installed by default from the latest boot2docker.iso from github.
A flavor of Ubuntu is installed by default on remote hosts.
Some drivers allow the image to be changed with a --<driver>-image flag or similar.
Check the official documentation for a list of available drivers and driver-specific documentation.
Run docker-machine create --driver <driver name> -h for a list of supported driver-specific parameters.
Examples
Creating a local VM on VirtualBox
docker-machine create --driver virtualbox <vm-name>
For more options, refer to the documentation.
Creating a local VM on Hyper-V
On modern computers running a recent version of windows, you can use the native Hyper-V platform instead of VirtualBox. This requires turning on the Hyper-V virtualization windows features and enabling Virtualization Extensions in BIOS (e.g. intel vt-x or amd-v). Google for enabling virtualization extensions / virtualization technology for your hardware. Note that VirtualBox won’t work while Hyper-V is enabled. One set of instructions can be found here.
Setting Up Hyper-V and Networking for Docker
Follow instructions here or here for setting up docker to use Hyper-V. You must run all docker-machine commands in a terminal launched as administrator, including listing machines (Hyper-V controlled instances cannot be controlled unless running as administrator).
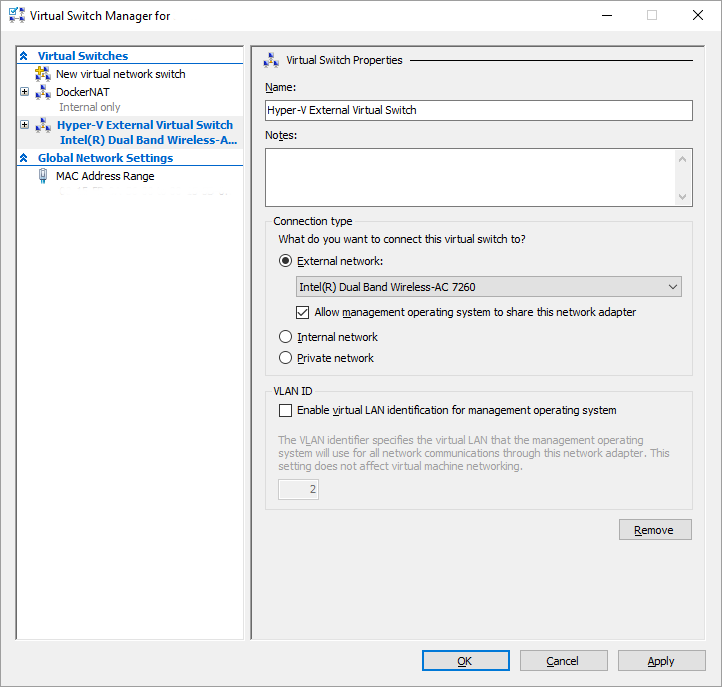
In a nutshell, you must create a virtual network switch in Hyper-V Manager (local machine -> Virtual Switch Manager… -> New virtual network switch). For the switch type, you can select either external (bridge the VM through a NIC on your computer) or internal (accessible only from host). TODO NAT switch?
External Switch
To expose the VM to the surrounding network, select the External virtual switch type. In the switch configuration, select the appropriate External network (physical network adapter). The VM will be visible as
Internal Switch
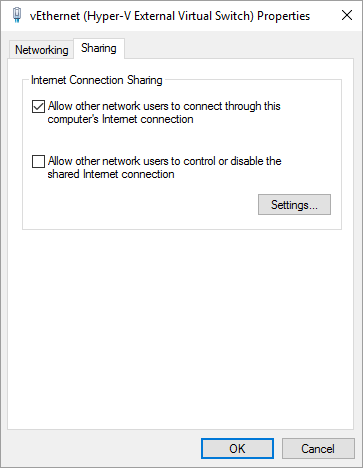
An internal switch does not expose the machine to the surrounding network but does not permit access outside either by default. You can use internet connection sharing to facilitate outbound network connections example. (Note that if you already have an external virtual switch using the same physical interface, then it seems that you need to share the existing external virtual network interface instead of the physical one.) This way the VM is only accessible from the local machine but is not disturbed by changes in the network, which is likely, for example, on a laptop that you use in multiple networks.
If you installed the Docker for Windows tool instead of Docker Toolbox, you should already have an internal virtual switch called DockerNAT. The default docker VM works out of the box, but connectivity for additional Hyper-V VMs still require setting up internet connection sharing.
On Windows 10, enabling internet connection sharing for an adapter displays the following warning:
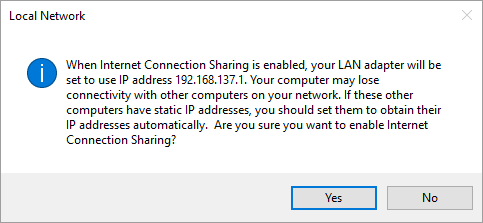
It may be safer to create an external virtual switch in addition to the internal switch and share that instead.
The internal virtual switch will be routed automatically through the external switch. No additional steps are required, but if you have other VMs on your computer you may need to restart them (or exit and start Docker for Windows again).
Creating the VM
Run docker-machine create --driver hyperv --hyperv-virtual-switch <Virtual Switch Name> <vm-name> as administrator.
The driver name has changed from
Hyper-Vtohyperv
You may see the following error but it does not seem to matter:
This machine has been allocated an IP address, but Docker Machine could not reach it successfully.
SSH for the machine should still work, but connecting to exposed ports, such as the Docker daemon port (usually
:2376), may not work properly. You may need to add the route manually, or use another related workaround.
This could be due to a VPN, proxy, or host file configuration issue.
You also might want to clear any VirtualBox host only interfaces you are not using.
Virtual Switch Name defaults to the first virtual switch found.
For more options, refer to the documentation.
Creating a VM on KVM (locally)
Managing docker hosts on KVM works only locally at the moment since the driver used below does not yet have remote management capabilities.
Using docker-machine with KVM requires a third party driver, e.g.: docker-machine-kvm. (For setting up a KVM environment, see Virtualization With KVM.)
apt-get install libvirt-go
curl -L https://github.com/dhiltgen/docker-machine-kvm/releases/download/v0.6.0/docker-machine-driver-kvm > /usr/local/bin/docker-machine-driver-kvm
chmod +x /usr/local/bin/docker-machine-driver-kvm
Creating a VM: docker-machine create --driver kvm --kvm-cpu-count 1 --kvm-disk-size 20000 --kvm-memory 1024 <vm-name>
To expose the VM to the surrounding network by connecting the VM to an existing host bridge, add --kvm-network <network name> to the above command, where network name is the name of a host bridge added as a virtual network or reconfigure networking after creating the VM.
See Virtualization With KVM.
The VM created this way has two network interfaces, one in the docker-machines network and the other on the virtual bridge or the specified network. The docker-machine ip <vm-name> command returns the ip address in the docker-machines network.
To find out the bridged ip address of the VM, use docker-machine ssh <vm-name> "ip -one -4 addr show dev eth0|cut -f7 -d' '"
Generic
Use this driver to set up docker engine on existing hosts.
You must be able to SSH into an existing server with SSH key (instead of password). To enable logging in with a certificate on ubuntu, perform the following steps:
- On the local machine, create keys using
ssh-keygen. Here we enter~/.ssh/<server-key-name>as the file name and path for the key (default file name is id_rsa). - To send the key over to the VM, execute
ssh-copy-id -i ~/.ssh/<server-key-name> <user>@<server>(the contents of the key will be inserted into~/.ssh/authorized_keys. You can do this manually if the ssh-copy-id command is not available). - To log in with the certificate credentials, execute
ssh -i ~/.ssh/<server-key-name> <user>@<server>(the -i option is not required if using the default key name).
To use the same key on another client machine just copy the private certificate file (extensionless, not the .pub one) on the other computer and refer to that file using the -i switch (or use default location for key files and the key name id_rsa).
Check out the following forum posts and docs:
You must also enable passwordless sudoing for the user. On ubuntu, one way of accomplishing this is to do the following on the remote host:
Run visudo as root and add the NOPASSWD: bit on the following line
%sudo ALL=(ALL:ALL) NOPASSWD:ALL
If that does not work, try adding the line <user> ALL=(ALL) NOPASSWD:ALL instead with the correct ssh username as <user>.
TODO might not be required anymore:
- https://blog.dahanne.net/2015/10/07/adding-an-existing-docker-host-to-docker-machine-a-few-tips/
- https://github.com/docker/machine/issues/1569
See here and here for more information.
Then, on local host, run docker-machine create --driver generic --generic-ip-address <server-ip> --generic-ssh-user <user> --generic-ssh-key ~/.ssh/<server-key-name> <docker-host-name> where <docker-host-name> is the new name of the machine (the server will be referred to with this name in docker-machine and the host name in /etc/hostname on the remote host is also changed to reflect this).
If you run this multiple times against the same machine with a different
<docker-host-name>parameter, you will get multiple entries in docker-machine’s registry pointing in the same host with different names, but only the last name will appear in/etc/hostname.
For more information, refer to the documentation.
Creating a remote VM on Azure
docker-machine create --driver azure\
 --azure-subscription-id <subscription-id>\
 --azure-location <region>\
 --azure-size <size>\
 --azure-vnet <vnet>\
 --azure-subnet <subnet>\
 --azure-resource-group <resource-group>\
 <vm-name>
…where:
-
<subscription-id>is your Azure Subscription ID. (Search for Subscriptions in the management portal, look under settings in classic portal.) -
<region>is the name of the azure region, e.g. “northeurope” (default is “westus”). See available regions TODO list of valid region codes or just need to guess based on region name? -
<size>is the pricing tier of the VM, e.g. Basic_A1 (default is Standard_A2). See VM pricing). -
<vnet>is the name of the virtual network (default is “docker-machine-vnet”). The virtual network is created automatically if it does not exist. -
<subnet>is the name of the subnet in the virtual network (default is “docker-machine”). The subnet is created automatically if it does not exist. -
<resource-group>is the name of the resource group (default is “docker-machine”). The resource group is created automatically if it does not exist. -
<vm-name>is 3-63 characters long and contains only lower-case alphanumeric characters and hyphens (a hyphen must be preceded and followed by an alphanumeric character). Otherwise creating the virtual hard disk image fails.
You will need to authenticate by opening a url in a browser and entering an authentication code (both are presented by the tool on the command line).
Running pre-create checks...
Microsoft Azure: To sign in, use a web browser to open the page https://aka.ms/devicelogin.
Enter the code [...] to authenticate.
You will need to re-authenticate with Azure occasionally (at least in two week intervals) when running commands against the machine.
Some commands (e.g. docker-machine ls) timeout too quickly for you to enter the credentials.
When you need to re-authenticate, use a command with a longer timeout so that you have more time to complete the authentication (e.g. docker-machine env or docker-machine ssh).
For more options, refer to the documentation.
Service Principal Authentication
A new feature adds azure service principal authentication which can be used to replace the interactive authentication method, e.g. for headless environments or automation.
Setting up the service principal can be done as follows:
- First, create a service principal in the Azure Portal (instructions) or using the Azure CLI (instructions).
- Create a key in the portal if using the portal to create the service principal.
- The service principal must be assigned to the Owner or Contributor roles in the subscription settings. Read through the above instructions links for details.
- Portal: go to your subscription, select Access control (IAM), click Add, choose the Contributor role and then look for the newly created service principal by name.
When the service principal has been set up, you can use the docker-machine create with command line switches --azure-client-id <id> and --azure-client-secret <secret> using values from the service principal.
Alternatively, specify the service principal values as environment variables AZURE_CLIENT_ID and AZURE_CLIENT_SECRET.
Note:
- Service Principal is also known as App registration (in the portal).
- Client ID is also known as Service Principal Name (the guid in the CLI output) and Application ID (in the portal).
- Client Secret is either the password specified for the CLI operation with the
-pswitch (TODO right?) or the manually added Key in the portal.
For more information, look here. The published Azure driver documentation does not yet reflect this information at the time of writing, but you can dig in here.
Common Errors
Occasionally you may see an error message like this one when attempting to authenticate
Error checking TLS connection: Error creating Azure client: Error deleting stale token file: remove
.json The process cannot access the file because it is being used by another process.
It is safe to remove the file in question by hand (it is not really locked)
Certificate Errors
Error checking TLS connection: Error checking and/or regenerating the certs: There was an error validating certificates for host “xxx:2376”: tls: DialWithDialer timed out You can attempt to regenerate them using ‘docker-machine regenerate-certs [name]’. Be advised that this will trigger a Docker daemon restart which will stop running containers.
Stored Azure credentials expired. Please reauthenticate.
You can regenerate the certificates as instructed but if you are accessing the machine from multiple computers, then the certificates need to be transferred again to any other clients on other computers.
I’ve observed this happening at least when dropping a VPN connection, then getting resolved by reconnecting to the VPN.
TODO in what circumstances does this happen exactly?
Azure Configuration
To expose ports to the internet you need to configure the virtual machine firewall and optionally the dns name.
Firewall
In Azure portal you can find the settings by clicking the
Click on Inbound security rules under settings, then add the ports you need to expose.
DNS
In Azure portal you can find the settings by clicking the
Click Configuration under settings and type a DNS name label at the bottom of the screen (the FQDN of the server becomes <label>.<azure-region>.cloudapp.azure.com)
Creating a remote VM on AWS
TODO
Removing a VM
docker-machine rm <vm-name>
This will also attempt to remove related resources such as virtual networking infrastructure that was created along with the virtual machine.
By adding the -f flag the command works also if the creation of the VM failed for some reason but docker-machine still thinks that the machine exists.
To remove the machine entry without removing the VM itself, you need to remove the machine directory manually from ~/.docker/machine/machines.
Importing an Existing Machine
Currently there is no easy way to export/import docker-machine configurations in the docker-machine tooling itself.
However, this can be accomplished manually by copying files from the ~/.docker/machine/ directory or by using 3rd party scripts.
Scripts
TODO machine-share, see npm or github
NOTE: Does not work on windows.
Manually
Copy the entire machine directory e.g. ~/.docker/machine/machines/<machine-name> to the machines directory on another computer. Change paths in the config.json file to reflect the new computer if necessary.
Additionally, change the AuthOptions section in config.json to point to keys under the <machine-name> directory instead of the certs directory. For example on windows:
Before:
{
  ...
  "HostOptions": {
    ...
    "AuthOptions": {
      "CertDir": "C:\\Users\\<user>\\.docker\\machine\\certs", <--
      "CaCertPath": "C:\\Users\\<user>\\.docker\\machine\\certs\\ca.pem", <--
      "CaPrivateKeyPath": "C:\\Users\\<user>\\.docker\\machine\\certs\\ca-key.pem", <-- this key is not present in the machine directory but is not needed either
      "CaCertRemotePath": "",
      "ServerCertPath": "C:\\Users\\<user>\\.docker\\machine\\machines\\<machine-name>\\server.pem",
      "ServerKeyPath": "C:\\Users\\<user>\\.docker\\machine\\machines\\<machine-name>\\server-key.pem",
      "ClientKeyPath": "C:\\Users\\<user>\\.docker\\machine\\certs\\key.pem", <--
      "ServerCertRemotePath": "",
      "ServerKeyRemotePath": "",
      "ClientCertPath": "C:\\Users\\<user>\\.docker\\machine\\certs\\cert.pem", <--
      "ServerCertSANs": [],
      "StorePath": "C:\\Users\\<user>\\.docker\\machine\\machines\\<machine-name>"
    }
    ...
  }
  ...
}
After:
{
  ...
  "HostOptions": {
    ...
    "AuthOptions": {
      "CertDir": "C:\\Users\\<user>\\.docker\\machine\\machines\\<machine-name>", <--
      "CaCertPath": "C:\\Users\\<user>\\.docker\\machine\\machines\\<machine-name>\\ca.pem", <--
      "CaPrivateKeyPath": "C:\\Users\\<user>\\.docker\\machine\\machines\\<machine-name>\\ca-key.pem", <--
      "CaCertRemotePath": "",
      "ServerCertPath": "C:\\Users\\<user>\\.docker\\machine\\machines\\<machine-name>\\server.pem",
      "ServerKeyPath": "C:\\Users\\<user>\\.docker\\machine\\machines\\<machine-name>\\server-key.pem",
      "ClientKeyPath": "C:\\Users\\<user>\\.docker\\machine\\machines\\<machine-name>\\key.pem", <--
      "ServerCertRemotePath": "",
      "ServerKeyRemotePath": "",
      "ClientCertPath": "C:\\Users\\<user>\\.docker\\machine\\machines\\<machine-name>\\cert.pem", <--
      "ServerCertSANs": [],
      "StorePath": "C:\\Users\\<user>\\.docker\\machine\\machines\\<machine-name>"
    }
    ...
  }
  ...
}
Other Methods
You could also use the create command with the generic driver to configure an existing host, but the host certificates will get regenerated thereby invalidating access from the original computer. In addition, the docker engine will be restarted and any running containers will be stopped. TODO and restarted if configured with the --restart option?
TODO Apparently there used to be a “none” driver available that could be used for this purpose but it seems to have been removed. However, using the none driver still involved manually copying certs around.
TODO follow these:
- https://github.com/docker/machine/issues/23
- https://github.com/docker/machine/pull/29
- https://github.com/docker/machine/issues/1328
Interacting With the Docker Host
Run docker-machine ls to view a list of machines managed by the current host.
To find out the ip address of the VM, use docker-machine ip <vm-name>.
NOTE: The host name of a VM on virtualbox seems to be boot2docker when first created, bridged to a network that uses DHCP for DNS.
Rebooting the VM seemed to rectify the issue.
Run docker-machine env <vm-name> to get instructions (and copy-pasteable single-line command for your system) for setting up the command line environment to point to the correct instance for subsequent docker commands.
The one-liners look like this:
- On linux:
eval $(docker-machine env <vm-name>). - On windows cmd shell:
@FOR /f "tokens=*" %i IN ('docker-machine env <vm-name>') DO @%i - On windows powershell:
& "C:\path\to\docker-machine.exe" env <vm-name> | Invoke-Expression
Run docker info or docker version to show information on the host and to verify connectivity. Use docker-machine ssh <vm-name> to ssh to the VM.
Commands
-
docker-machine lslist VMs created using docker-machine on the current host -
docker-machine env <vm-name>get env configuration for CLI -
docker-machine ip <vm-name>get ip address of VM -
docker-machine ssh <vm-name>ssh access -
docker-machine scp <vm-name>:<path> <path>copy file from machine to local directory -
docker-machine scp <path> <vm-name>:<path>copy file from local directory to machine -
docker-machine inspect <vm-name>machine information -
docker-machine start <vm-name>start -
docker-machine stop <vm-name>stop -
docker-machine restart <vm-name>restart -
docker-machine kill <vm-name>kill -
docker-machine rm <vm-name>remove
See more information in docker-machine reference.
Connecting to a Remote Docker Host with the CLI
To connect to a machine running docker, you need to:
- Obtain the url address of the remote host e.g.
tcp://aa.bb.cc.dd:2376(default port 2376). - Obtain the TLS certificates for the host
If you have created the machine using docker-machine, you can get the url and a path to the certificates by running docker-machine env <vm-name> as long as you are working on the computer where the machine was created in the first place.
To connect from another machine, copy the certificates from the machine path on the original computer to a directory on the new computer (or just copy the entire machine directory). See also Importing an Existing Machine to Docker Machine.
After running the following commands you should be able to run docker commands against the remote host:
SET DOCKER_TLS_VERIFY=1
SET DOCKER_HOST=<host-url>
SET DOCKER_CERT_PATH=<path-to-cert-directory>
Set up a cluster on Swarm
TODO https://docs.docker.com/swarm/provision-with-machine/